
What Is a CDL Pre-Trip Inspection?
A CDL pre-trip inspection is a systematic check of a commercial motor vehicle performed before every trip. The Federal Motor Carrier Safety Administration (FMCSA) requires all commercial drivers to inspect their vehicles before operating them on public roads. The inspection is designed to identify defects or deficiencies that could affect safe operation.
For CDL students in Oregon and Washington, the pre-trip inspection is also a required component of the CDL skills test. A state-certified examiner evaluates the driver’s ability to identify key vehicle components and make sure the vehicle is safe to operate. Failing the pre-trip portion of the skills test will result in a failed test overall.
Pre-trip inspection is covered during CDL training at Elite Truck School across all campuses in Oregon and Washington.
Why the Pre-Trip Inspection Matters
Federal regulations state that a commercial motor vehicle can’t be driven unless the driver is satisfied that all required parts and accessories are in good working order. This is not a suggestion. It is a federal requirement with real consequences for non-compliance.
Beyond the legal requirement, pre-trip inspections serve a practical purpose. A loaded semi-truck can weigh up to 80,000 pounds. Brake failure, tire blowouts, or lighting defects at highway speed create serious hazards for the driver and others on the road. The pre-trip inspection is the driver’s first line of defense against mechanical failures that could lead to accidents, fines, or out-of-service orders.
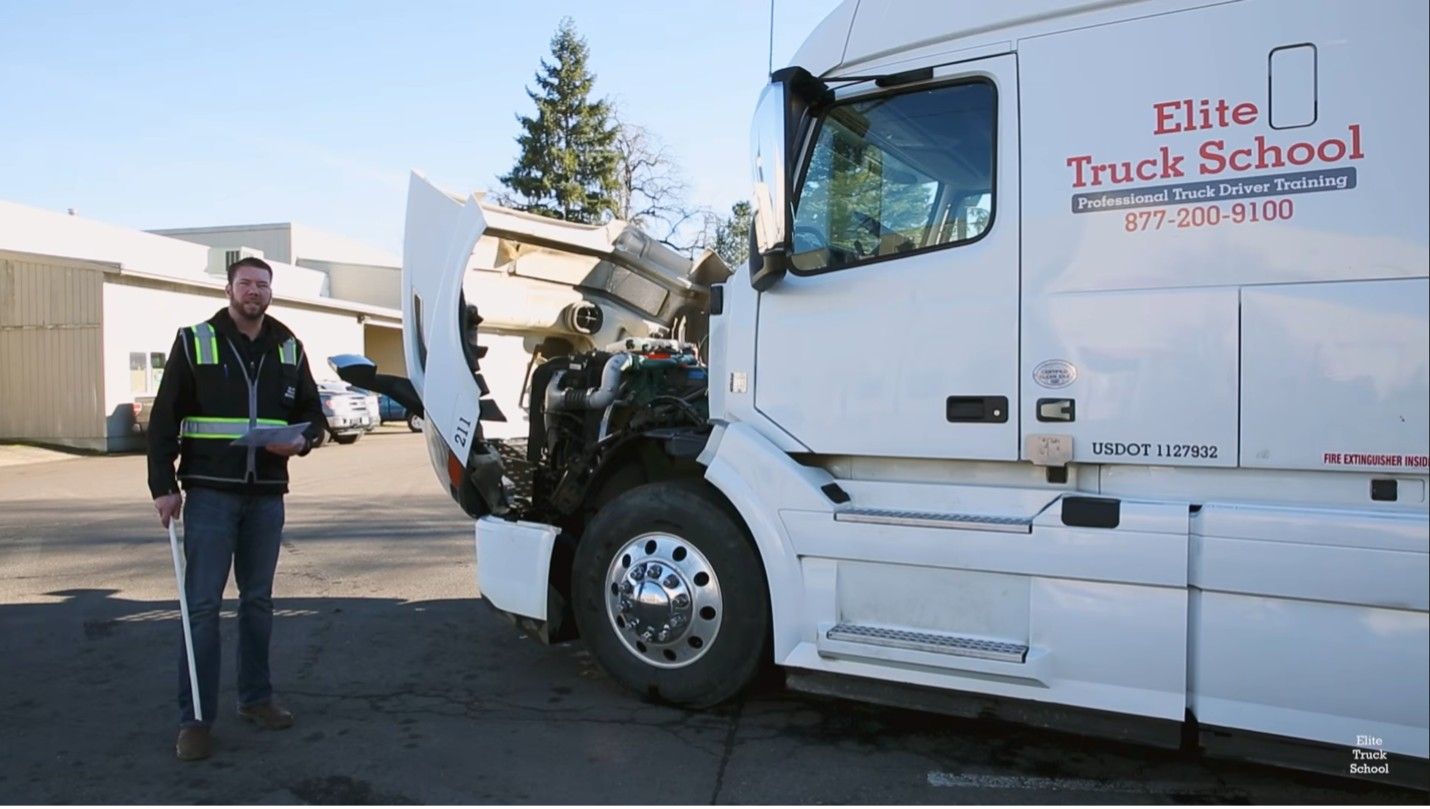
Oregon Pre-Trip Inspection Walkthrough Video
The video below walks through the pre-trip inspection as it is conducted in Oregon. Watch the full walkthrough before reviewing the written breakdown below.
Washington Pre-Trip Inspection Walkthrough Video
Washington CDL students can refer to this video for a state-specific walkthrough.
The Seven Areas of the CDL Pre-Trip Inspection
The pre-trip inspection is organized into seven general areas. During the CDL skills test, the examiner expects the driver to move through each area in a logical, systematic order while verbally identifying components and their condition.
1. Engine Compartment
The engine compartment inspection is performed with the hood up or tilt-cab raised. The driver checks fluid levels, looks for leaks, and confirms that belts and hoses are in good condition without cracks or fraying.
Key items to check:
- Engine oil level (on dipstick, within operating range)
- Coolant level (reservoir and overflow visible)
- Windshield washer fluid
- Power steering fluid (if equipped)
- Belts (no fraying, cracking, or slipping)
- Hoses (no soft spots, cracks, or leaks)
- Battery (secured, terminals clean, no corrosion)
- Alternator and water pump (belts tight, no unusual wear)
2. Cab and Controls
With the driver inside the cab, the inspection covers safety equipment, gauges, and operational controls. The driver checks that all instruments are functional and that required safety items are present and accessible.
Key items to check:
- Steering wheel (no excessive play — no more than 10 degrees of free movement for vehicles with power steering)
- Mirrors (adjusted, clean, undamaged)
- Windshield (no cracks or obstructions in the driver’s field of view)
- Warning lights (check that dash lights illuminate on startup and extinguish properly)
- Horn (audible, functional)
- Windshield wipers (operational, blades in good condition)
- Heater and defroster (functional)
- Required safety equipment: fire extinguisher, three emergency triangles, spare fuses
3. Lights and Reflectors
All exterior lighting must be checked on both the tractor and trailer. The driver checks that lights illuminate, that lenses are not cracked, and that reflectors are clean and properly mounted.
Key items to check:
- Headlights (high and low beam)
- Turn signals and four-way flashers (front and rear)
- Brake lights
- Clearance lights (required on vehicles over 80 inches wide)
- Marker lights
- Reflectors (red to the rear, amber to the sides)
Note: On the skills test, the examiner may ask the driver to activate each light while a second person confirms visibility from the exterior.
4. Front of Vehicle (Steering Axle)
The front axle area covers the steering components, front tires, and wheel hardware. This area is inspected while crouching or bending to visually confirm the condition of components below the frame.
Key items to check:
- Steering components (no looseness, cracks, or missing bolts on steering linkage)
- Front tires (tread depth — minimum 4/32 inch for steering axle tires, no cuts or bulges)
- Tire inflation (visually check for low pressure; no audible air leaks)
- Lug nuts (all present, no rust streaks that indicate looseness)
- Hubodometer and hub seal (no leaks at the hub)
- Spring hangers and leaf springs (no cracks or broken leaves)
5. Fuel and Frame Area (Driver’s Side)
Moving along the driver’s side of the truck, the inspection covers the fuel tank, frame rails, and visible undercarriage components.
Key items to check:
- Fuel tank (secure, cap present, no leaks at tank or fuel lines)
- Frame and cross members (no cracks, bends, or broken welds)
- Exhaust system (no leaks, securely mounted, no contact with flammable parts)
- Air lines (no chafing, cracking, or loose connections)
- Electrical wiring (no fraying or unsecured wires)
- Battery box (secured, lid in place)
6. Rear of Tractor and Trailer
The rear area inspection covers the coupling system, trailer lights, and rear axle components. For a combination vehicle (Class A), this also includes the fifth wheel and kingpin connection.
Key items to check:
- Fifth wheel (properly locked, no visible gap between upper and lower plate, safety latch engaged)
- Kingpin (secure, no excessive wear)
- Air and electrical lines to trailer (glad hands secure, lines not dragging)
- Rear trailer lights (brake lights, turn signals, clearance lights)
- Trailer mud flaps
- Rear impact guard (no damage, securely mounted)
- Drive axle tires (minimum 2/32 inch tread depth, no cuts or bulges)
- Dual tire spacing (no debris caught between duals)
7. Passenger’s Side and Return to Cab
The inspection is completed by walking along the passenger’s side of the vehicle back to the cab. This mirrors the driver’s side inspection.
Key items to check:
- Passenger-side tires and wheels (same criteria as driver’s side)
- Fuel tank (if vehicle has dual tanks)
- Frame and undercarriage (same criteria as driver’s side)
- Passenger door (secure, latch functional)
After returning to the cab, the driver checks the in-cab air brake test (covered in the air brakes section below) and confirms the parking brake holds.
Air Brake Inspection
Vehicles with air brakes require an additional inspection of the air brake system. This is tested separately on the CDL skills test and is a required portion of the pre-trip for any driver operating a vehicle with air brakes.
The air brake check involves two tests:
Static Leakage Test
With the engine off and full air pressure built up (at or above 100 psi), the driver applies the service brakes and holds them for one minute. Pressure should not drop more than 3 psi for a single vehicle or 4 psi for a combination vehicle.
Low Pressure Warning Test
With the engine off, the driver pumps the brakes to reduce air pressure until the low-pressure warning signal activates. The warning must activate before pressure drops below 60 psi.
Spring Brake Test
The driver continues reducing pressure below 20-45 psi (varies by vehicle) to confirm the spring brakes (parking brakes) automatically engage.
A driver who cannot complete the air brake check correctly will not pass the CDL skills test, regardless of performance in other areas.
Oregon vs. Washington: Key Differences in the Pre-Trip Inspection Test
While the pre-trip inspection itself follows FMCSA standards in both states, the testing procedures differ in a few ways. CDL candidates should know the relevant rules before their test day.
| Oregon | Washington | |
| Checklist during test | Not permitted | May be permitted |
| Verbal descriptions | Required — detailed knowledge expected without aids | Required — may vary by examiner |
| Test result validity | Check with Oregon DMV for current policy | Results valid for six months; all sections must be completed within that period |
| Examiner focus | Comprehensive physical walk-around with in-depth component knowledge | Components and verbal descriptions required; examiner focus may vary |
Students training in Oregon can refer to the Oregon pre-trip video above. Washington students should refer to the Washington pre-trip video above.
For state-specific requirements, candidates can review the Oregon and Washington CDL requirements pages on the Elite Truck School website, or refer directly to:
- Oregon DMV CDL Skills Test Information
- Washington DOL CDL Skills Test Information
- FMCSA Entry-Level Driver Training (ELDT) Final Rule
How Pre-Trip Inspection Is Taught at Elite Truck School
Pre-trip inspection is introduced during Week 2 of the Class A CDL program at Elite Truck School. Students practice the inspection on actual training vehicles before taking a pre-trip test that is structured to mirror the third-party CDL skills test. This means students have already performed the inspection in a test-like environment before they ever stand in front of an examiner.
The same approach applies to the Class B CDL program. Pre-trip requirements vary slightly for Class B vehicles, but the systematic approach and component knowledge requirements are consistent.
Elite Truck School operates five campuses across Oregon and Washington: Albany, Eugene, Hillsboro, and Portland in Oregon, and Vancouver in Washington. All campuses deliver the same FMCSA-approved, 160-hour curriculum.
Frequently Asked Questions About the CDL Pre-Trip Inspection
Is the pre-trip inspection part of the CDL skills test?
Yes. The pre-trip inspection is one of three components of the CDL skills test, along with the basic vehicle control (backing) test and the on-road driving test. Failing the pre-trip inspection results in a failed skills test.
How long does the pre-trip inspection take during the CDL test?
Typically between 30 and 60 minutes, depending on the examiner and the vehicle. Students who have practiced consistently tend to complete the inspection efficiently without rushing.
What happens if a driver skips the pre-trip inspection before a real trip?
Skipping the pre-trip inspection violates federal regulations. A driver or carrier can receive fines, and if a preventable accident occurs and no inspection was performed, liability increases significantly.
Does Elite Truck School teach the pre-trip inspection?
Yes. Pre-trip inspection is a core part of both the Class A and Class B CDL training programs at Elite Truck School. Students practice on training vehicles and complete a pre-trip test before their CDL skills test.